
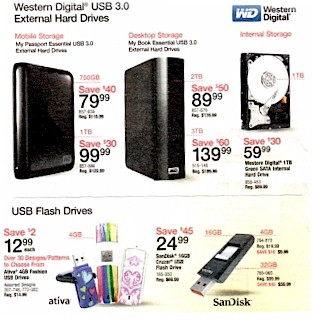
 Monthly Backup - Computers are machines that
will eventually breakdown over time. Having your important files, photos and
music backed up can make the process less painful. For this reason I am now
recommending that you do a monthly backup of the things that you feel that you
could not be without, in the case of a computer crash. In the photo above are
examples of the different products that are available to help you through this
process. The products range from a simple flash drive all the way to an external
hard drive. You also have the option of storing your files online (ie iCloud),
but I personally feel better if I am in possession of my files not some computer
in California or Virginia.
You should do your monthly backups from your account on the computer.
Below is a photo of the devices that I recommend with a brief description of what each does. When you decide on the product you want to use, click on the 'click here' link for step by step instructions.
USB Flash Drive (also
called Thumb Drives) Holds the storage space from 4 gigabytes up to 64 gigabytes. You must
find the files that you want to backup & then drag them into the USB window. Note that you must eject drive before you remove it from
the computer, if you pull it out before ejecting, the data on the drive can be
destroyed. - click here
for step by step instructions
CD or DVD 's disks are a
more stable means of backup, data is burned into the disks surface. Like
the flash drive, you must find the items you want to backup & drag & drop them
into the CD/DVD window. Most Windows computers come with a software program
that enables you to create CD/DVD disk. The standard storage is from 700 megabytes (MB) on a CD
up to 4 1/2 gigabytes (GB) on a DVD
Click here for step by step instructions.
Portable External
Hard - these are becoming very popular for computer backups. The
prices have dropped and the storage capacity has risen making this the preferred
device. The drives are well built & able to withstand being dropped
from time to time without breaking. The storage space ranges from 350 gigabytes
(GB) to 3 terabytes (TB) Most drives include a software program that will assist
you with your backup process. - Click here for
instructions
Desktop External
Hard drive - Unlike the portable external hard drive, these devices
are more delicate & should be handled with care when in use. They are built to
stand upright on your computer desk & they plug into an electrical outlet
(the portable drive uses the computer to power the device). Most drives have
software programs that like the portable drive guides you through the backup
process. - Storage space ranges from 500 gigabytes (GB) to 3 terabytes (TB) - Click here
for instructions
So monthly backups are optional, but I recommend that you do monthly backups to save the items that you feel you can not risk losing. I have been backing up my photos over the years on CD's then more recently on DVD's.
USB Flash Drive (also called Thumb Drives) up to
64 Gigabyte
USB Flash Drive instructions
Step 1 - When you insert your flash drive into a USB port on your computer the Autoplay window should pop up that looks like the one above. Chose the option - "Open folder to view the files". Note - using this method, you should be logged into your everyday account not the Maintenance account, so you can find your files without having to search the entire computer.
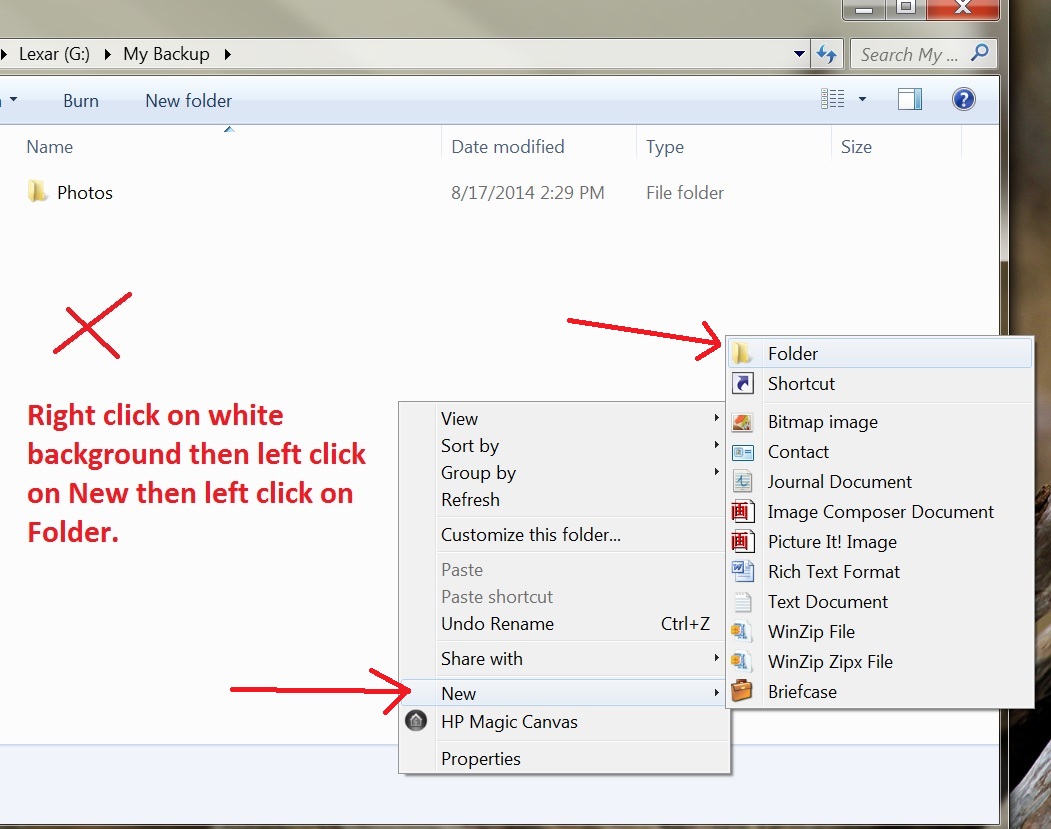
Step 2 - Your Flash Drive opens & displays the contents. You can use folders to help organize your items. To create a folder, see picture above. Then type in the name of the folder (Documents, Photos, Videos).
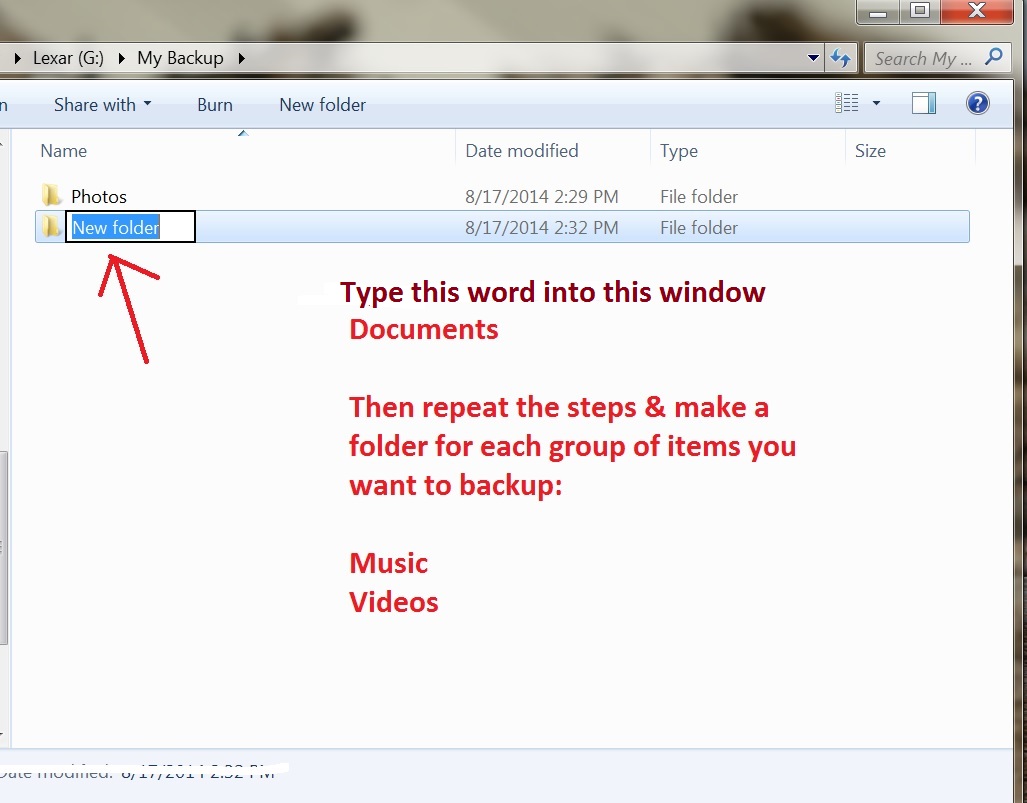
Step 3 - open the folder on your USB drive, double click to open (see below)
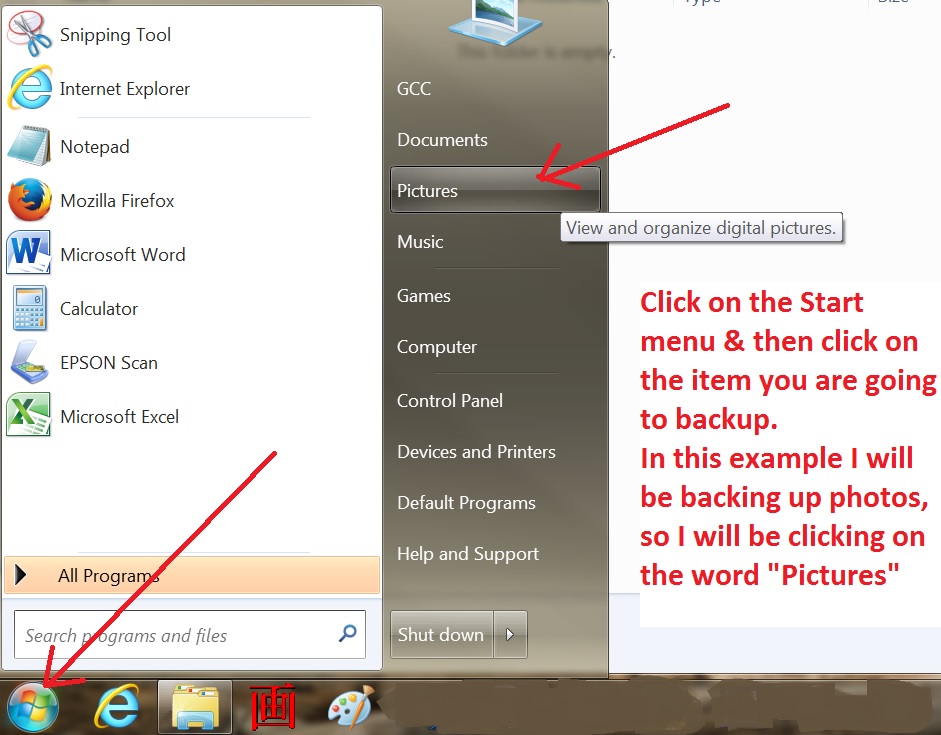
Step 4 - Start to search your account for the items that you want to backup. Click on the Start button then click on the item you want to back up.
Step 5 - Now you are ready to copy your files from your computer onto the USB Flash Drive. To do that you need to click on the first item that you want to save, the sample I am using below I am copying a photo to the USB drive. So using the mouse, left click on the photo & hold down on the mouse then drag the photo to the USB drive, then move into the new folder you created & then release the mouse button. This is called the Drag & Drop Method. Now you need to do the same process with every item that you want to backup onto your USB drive. The first time you do your backup up, you need to select all the files that you want to backup, then each month you only select the new files that were added to your computer during the past month.
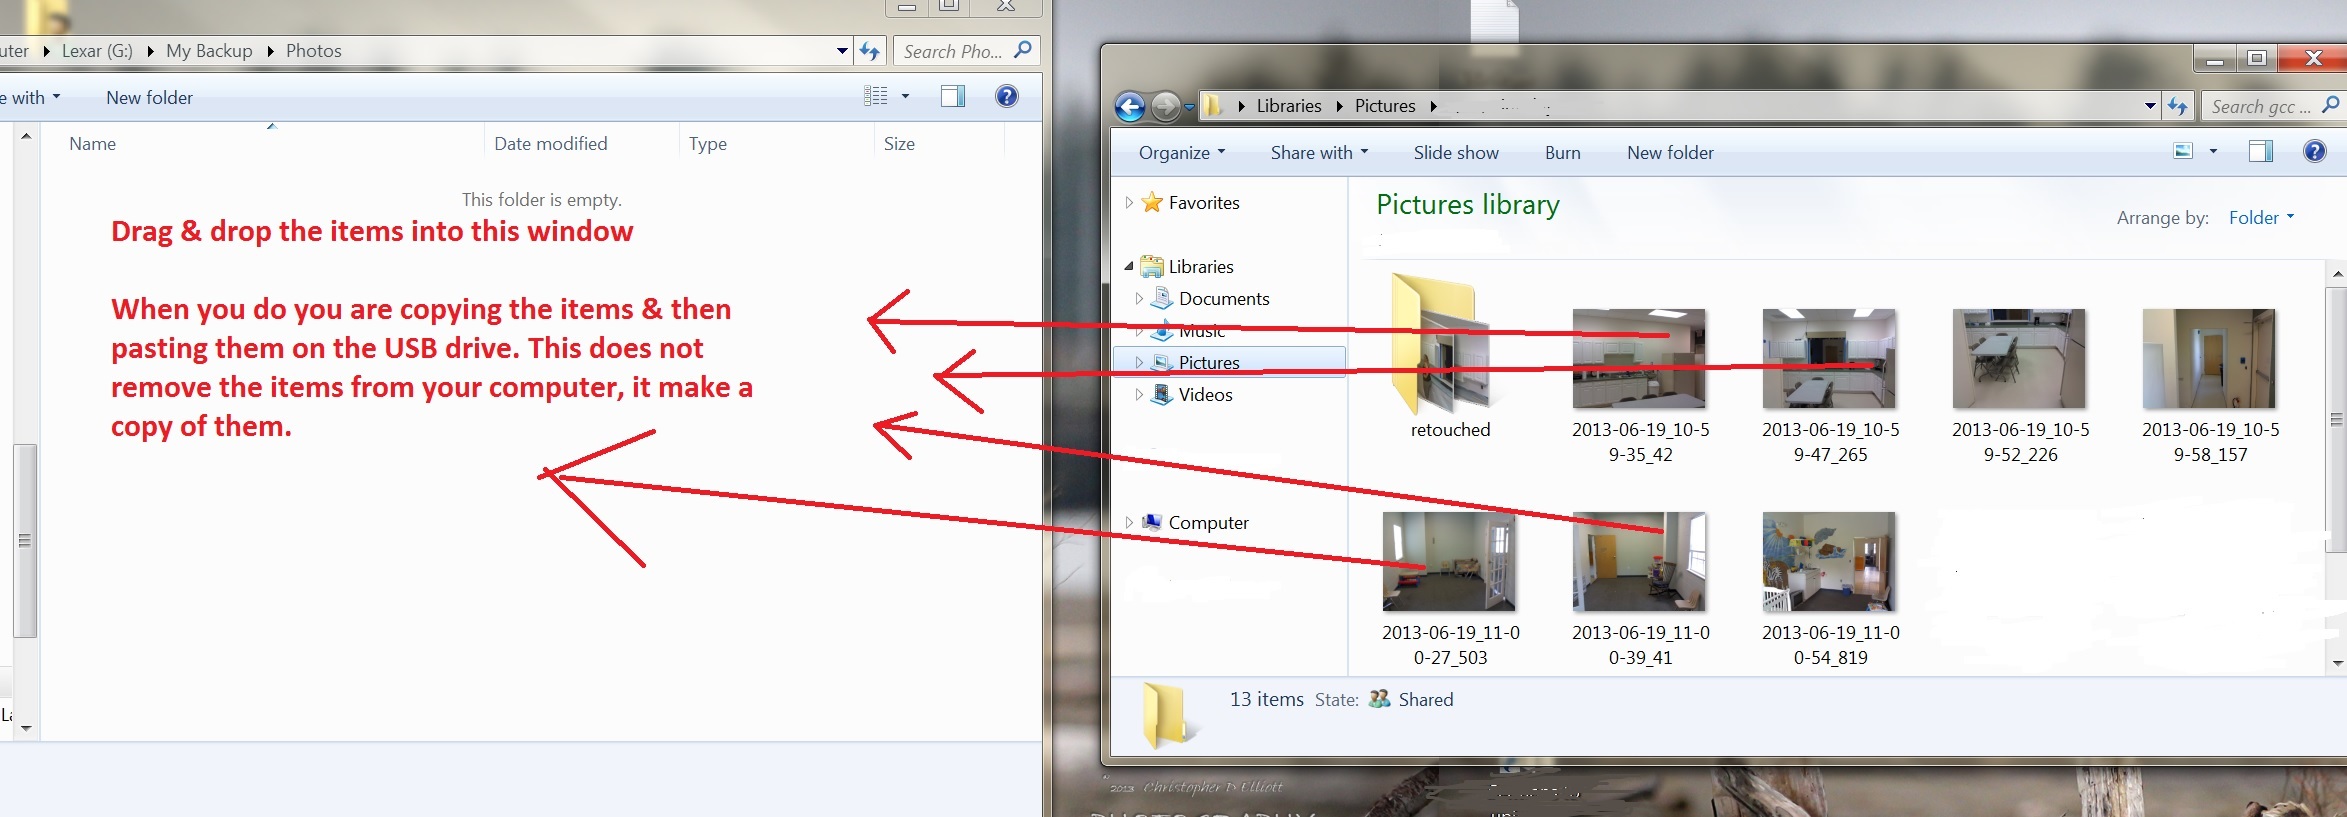

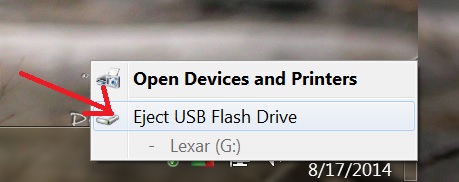
Step 5 - When you are done you can close all the open windows by clicking on the Red X in the top right corner of the window. Now the most important thing is to Eject your USB Flash drive from your computer. If you just pull the drive out of your computer all your files on the USB drive can become corrupt & unreadable. After you closed the USB Flash Drive window, look down by your clock in the bottom right corner for the flash drive icon.
The Eject Flash Drive icon will look like a grey box with a green check mark. Using the mouse, left click on this icon once & a window will appear that says Eject USB Flash Drive (see photo below). Click on that text & a new message will appear 'Safe to Remove Hardware' - now you can pull the Flash Drive out of your computer.

Then store the Flash Drive in a safe place that you will be able to find it for next month's backup. You can place it in a draw or put a string on it & hang it on a hook next to your computer.
Click here to return to previous page.
CD 700 megabyte or DVD 4
Gigabyte
CD/DVD structions
Step 1 - Insert a blank CD or DVD disk. Autoplay window will open with options that you can choose from. I recommend the second option in the above picture - Burn files to disk using Windows. Click on this option with the mouse.
Step 2 - The Prepare this blank disk window pops up. Click on the v Show formatting options window.
Step 3 - There are 2 options that you can choose from. For your first backup, I would recommend the Mastered option. This would make a permanent copy of your files. Then monthly, using a new blank disk, you can choose the first option - Live File System. This option gives you the ability to add & remove files, like you would if you were using a Flash Drive. For the Disc Title - put in this month & year (ie - 11-2011 or leave the default which is todays date). Then choose your option then click on the Next button.
Step 4 - Start to search your account for the items that you want to backup. Click on the Start button then click on Documents. Inside there you will find folders like Pictures, Music, Videos. You will also find individual documents that you created using programs like Word, Wordpad, etc. Open the window where you files, you can resize the window (see above) to a small box which will make the process easier. Then click back on your CD/DVD window & put it next to the other window.
Step 5 - Now you are ready to copy your files from your computer onto the CD/DVD. To do that you need to click on the first item that you want to save, the sample I am using above I am saving a music file to the disk. So using the mouse, left click on the song & hold down on the mouse then drag the song to the right, then move into the new folder you created & then release the mouse button. This is called the Drag & Drop Method. Now you need to do the same process with every item that you want to backup onto your disk. The first time you do your backup up, you need to select all the files that you want to backup, then each month you only select the new files that were added to your computer during the past month.
Step 6 - When you are done copying your files to the disk window, click on the Burn files to Disk button. Note - you may get a warning if you copy too much into the disk window, if it exceeds the maximum size of the disk. Some Music files may be over 2 gigabytes, which will take up to 3 CD's to backup. If you are using a DVD, you have more room for your files. Take notes to keep track of where you left off from the previous disk so that you do not get duplicates. When the disk is done, the CD/DVD tray will eject automatically. Take out the disk & mark on the face of the disk using a sharpie marker pen this month & year & then store the disk(s) in a safe place. Then close all the open windows when you are done.
Click here to return to previous page.
Portable External Hard drive 500 GB to 2 TB
- Most Portable & Desktop hard drives drives have the same software programs on
them. The main difference is the Portable drives use the computer power to run,
the Desktop drives plug into an electrical outlet. See the backup steps below,
which are the same for both drives.
Desktop External Hard drive - 1 TB to
3 TB - The instructions below are the same for all versions of Windows.
Step 1 - connect the drive to your computer. For the Desktop drive, plug into electrical outlet & connect the USB connector. The hard drive software program runs everyday on your computer keeping track of the new files as they are created. The first time you connect the drive, it backs up all of your files, then monthly, when you connect it, the software program copies over only the new files (some programs refer to these files as pending files).
The Segate drive that I have uses a software program called Memeo, it is shown above. The first backup took over an hour, then the monthly backups take about 2 minutes to complete. For novice users, this is the easiest method for monthly backup.
Step 2 - You must eject your drive before you disconnect it. If you just pull out the USB connector, the files on the external hard drive may become corrupt. Look down by your clock in the bottom right corner for an icon that looks like a flash dive with a green check mark. Click on the icon & the Safely remove USB Mass Storage Device window appear. Then click on the window & the external hard drive is ejected (computer will no longer see the external hard drive). You will then get the message below that it is safe to remove your hardware. Then pull out the USB connector & if it is the Desktop drive, unplug the hard drive. Now store your hard drive in a safe place. The Desktop drive can be left on your table, next to your monitor.
Click here to return to previous page